Showing posts with label ii. Show all posts
Showing posts with label ii. Show all posts
Wednesday, February 12, 2014
Building The Wine Rack Part II
Fabrication: Initial Cutting & Setup
Once I had the design sketched out on the LVL I began by making relief cuts in the back face which would make the concave curved cut easier.
 |
| These Relief Cuts Will Make Cutting The Rear Curve Easier. |
I did all my cutting on the band saw. This was the first project I made using my new Carter Guides. I won’t say they turn my crappy Ridgid band saw into a super star, but they do make it usable and predictable. For that, I give them credit and appreciation.
Once I had made the relief cuts, it occurred to me that a square block would be much easier to clamp and work then a curved one. Thankfully I thought of this when I did and left the back square (if slotted) for the time being.
Next, I cut out the “L” shape on the inside face. This too was easily done on the band saw using the Carter Guide. Though an “L” because the back and base are at 90° to each other, they are both reclined slightly to hold the bottle at a slight back tilt.
 |
| The Basic L. |
Once the “L” was cut out of the inside face, I got ready to sculpt the concave face of the back. Having picked up an ArborTech Turbo Plane and a Saburrtooth Extra Coarse donut wheel since my last power sculpted project, I began the sculpting on a practice piece. When I was done I had tried the Turbo Plane, Saburrtooth wheel, my Festool RAS 115 and my medium grit Kutzall wheel. While the Turbo Plane and Saburrtooth have some potential and the RAS 115 is a great tool for finer shaping, I ended up preferring the moderate material removal rate, controllability and smooth resulting finish of the Kutzall. To paraphrase Paul Lemiski, the Kutzall is awesome.
 |
| The Saburrtooth Extra Coarse Proved Too Aggressive. |
With the sculpting tool decided on, I took a scrap piece of 1x3 and screwed a very small piece of OSB to the end. Then I took the wine rack and placed it on the OSB. I secured it by screwing up through the OSB into the bottom of the wine rack. This firmly attached the 1x3 and allowed me to easily hold the rack in position with my bench vise.
Catch all the Wine Rack Posts Here.

Tuesday, February 11, 2014
Shop Tour M Scott Morton Part II
Pickup up where we left (Part I) off in Mortons shop at the sliding compound miter saw corner, if you then turn left, and run along the wall opposite the door, you’ll find his SawStop Cabinet Saw and his dust collector. While the saw stays set there against the wall, the dust collector does occasionally move, as it’s not permanently connected to most of the stationary equipment.
Moving passed the saw, the next corner is occupied by Morton’s Ridgid oscillating spindle sander (OSS) and Bench Dog router table. A storage cabinet of small draws rests next to the OSS and the lumber for Morton’s future bench lays next to the router table. On the walls above, a very small window frame and adjacent former window frame serve as cubbies to store toolboxes and other small items.
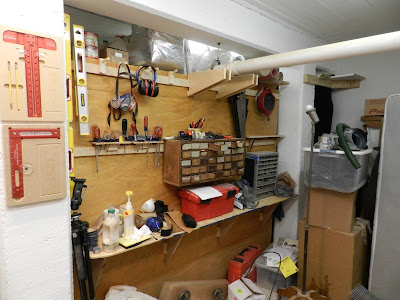
Rounding the OSS and router table corner brings us along Morton’s storage wall. He took advantage of a recess in the the middle of this wall section to build a storage rack for his Festool collection (bigger than mine, I’m pretty sure) and clamp racks. Because of the the recess in the wall, none of these racks steal valuable floor space.
If we stay along this wall and follow it to the end opposite the OSS, we’ll find a dead end created with the installation of shelves between a column and the wall between the shop and family room. Both sides of this “dead end” are used for storage. Some of it (like his utility and sharping bench) is kind-of organized. Some of it is not.
The kind-of organization also extends to the opposite side of the shelves. They house old tools, light fixtures, wine and all sorts of others, miscellaneous stuff. Moving passed the shelves brings us back to the shop entry door and through it, the family room.
As I mentioned above, Morton has the lumber for his new bench acclimating in his shop now. Like many of us, he’s caught the winter 2011/2012 workbench building bug. For now, he makes his torsion box assembly table serve double duty as a bench. It’s a fairly function bench, with a typical metal face vise and plenty of storage beneath that dead flat work surface.
Between his lumber storage, equipment, assembly table and future bench, Morton’s shop is a high functioning woodwork space that’s proofing perfect for producing his high quality custom furniture.
p.s. - since my visit in November, Morton has added a small child’s bench area to the shop for his kids. You can check out his post about it here.
Read More..
 |
| The router table, OSS, storage cabinet and bench lumber. |
 |
| Notice how Morton takes advantage of the recess in the wall to achieve a great deal of storage with no floor footprint. |
 |
| Storage on the back of the shelves in the "dead end" section of the shop. |
 |
| As we all do, Morton has shelves in his shop that hold a bit of everything. |
As I mentioned above, Morton has the lumber for his new bench acclimating in his shop now. Like many of us, he’s caught the winter 2011/2012 workbench building bug. For now, he makes his torsion box assembly table serve double duty as a bench. It’s a fairly function bench, with a typical metal face vise and plenty of storage beneath that dead flat work surface.
 |
| The existing, torsion box bench. |
p.s. - since my visit in November, Morton has added a small child’s bench area to the shop for his kids. You can check out his post about it here.
Subscribe to:
Posts (Atom)